Tuesday, 13 January 2015

How to Send ibots/Agents to Non-OBIEE users

Sometimes we need to send ibots or Agents to those who do not have access to OBIEE. This can be achieved by implementing the below mentioned steps.
(The screenshots below refers the OBIEE 10g version. You can also implement the same in OBIEE 11g)


1. Create a report using SA System Subject area. (Provided you have already configured the SA System subject area)


2. Create the report with two column only, Logon and email.

Select filter for Logon column and add the names of users you want to sent the ibots.  ie this report will act as the recipient list. 


3. Then your report will look like this:


4. Save the report with a meaningful name, say 'ibot_recipients'


5. Create a new ibot.


6. Under Conditional Request tab, select the previously saved report.


7.Schedule the ibot according to your requirement under the Schedule tab


8. Under the Recipients tab select the option 'Select Recipients from Conditional Request' and slect the  column as Logon


9.Under the Delivery Content tab, select the report you want to sent as ibot/Agent


10. Set the Destination profiles under Destination tab and Save the ibot.


Now you are all set. The ibot/Agent will be triggered to all recipients in the Conditional request report....!!!!


Cannot login to OBIEE 11g with correct user credentials

Scenario 1:


  1. In your RPD, under Identity menu please check whether the user is listed or not.
          For ex. If I am trying to login using the user  'weblogic' , check whether weblogic user is listed           under Identity users in Identity.

     2.  If present, delete the user.

     3. Save the RPD and deploy it, if opened in offline mode

     4. Restart the OPMN services.

     5. if this is not your scenario or this doesn't resolve your issue, try Scenario 2.


Scenario 2:


  1. Open the SQL developer and run the below query with Admin or SYS privilege

SELECT ACCOUNT_STATUS, USERNAME FROM DBA_USERS WHERE USERNAME  LIKE 'DEV%';
               (Please make sure your database schema for OBIEE starts with 'DEV')


     2.  Check the ACCOUNT_STATUS for the OBIEE schemas DEV_BIPLATFORM and DEV_MDS.


    3.   If the users are locked, run the below query

ALTER USER <username> ACCOUNT UNLOCK;


   4. If it shows an EXPIRED status, run the below query:

ALTER USER  <username>  IDENTIFIED BY <your_password>


   5. You can set the account status to NEVER EXPIRE and NEVER LOCKED state by running the below queries.


  1.  Find the profile name of the user
             SELECT  USERNAME, PROFILE  FROM DBA_USERS WHERE USERNAME IS <username> ;

    2. Once you identify the Profile run the query,

             ALTER PROFILE  <profilename> LIMIT  PASSWORD_LIFE_TIME UNLIMITED;
 
             ALTER PROFILE  <profilename> LIMIT  PASSWORD_LOCK_TIME UNLIMITED;


Monday, 12 January 2015

Create a simple mapping in Informatica

1. Open Informatica Repository Manager and select Configure Domains under Repository menu

2.       Click on New


3.        Provide proper connection details. (6005 is the default port)


4. Select  the associated repository ie created under Informatica admin console. Click OK


5. Connect the Repository


6. Provide Connection credentials

7. Create a new folder under Folder menu


8.    Enter folder name and click OK


9.Open Informatica Designer and  Right click on the folder and select Open


10. Select Import from Database under Source Menu


11.       Click on browse button


12. Create a new System DSN ODBC connection


13. Select Oracle Wire Protocol


14.Provide proper connection details and click on test connection


15. Provide username and password. Click OK


16.Once connection is successful click Apply and OK


17. Create connection for Target as well and click OK


18. In the ‘Import tables’ select connection to source


19.       Provide database connection details and click on connect.


20.   Select Employee table and click OK


21. In the TARGET database schema, create a Target Table as follows


22. Under Targets menu select Import from Database


23. Select Target connection, Provide database connection details and click on OK


24. Select EMPLOYEES table and click OK


25. Under mappings menu select Create


26. Enter a mapping name


27. Drag  the source into the editor window


28. Under Transformation menu select create


29. Select Expression transformation from the drop down and click on create and then click on Done


30. Drag all columns from Source Qualifier to Expression.


31. Double click on expression transformation and click on new column button.


32. Enter column name and select as output port. Select the expression builder for the Fullname column.


33. Enter the concatenation expression as below and click validate and then OK


34. Click apply and then OK


35. Drag the target table into the mapping editor


36. Map all columns from Expression transformation to Target table


37. Save the mapping. Make sure your mapping is valid.


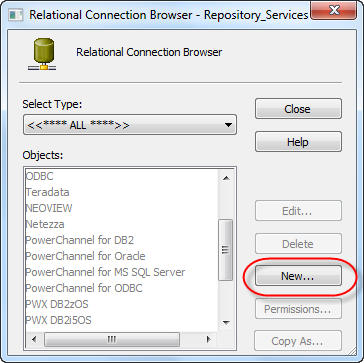
38. Open workflow manger and select Relational under Connections menu


 39. Select new


 40. Select Oracle and click OK


 41. Provide connection details and click OK


 42. Select new and create a connection for Target.


43.Provide connection for Target and click OK


 44. Under Tasks select create


 45.Select session from the drop down and provide a session name and click create


 46. Select the mapping and click OK


 47. You can see a session created


 48. Under workflows menu select create.


 49. Enter workflow name


 50. By default, A workflow is created with a start task


 51. Drag the session into the workflow editor.


 52. Select link task


 53.Draw the link from start to session


54. Double click on session


 55. Under mapping tab select  Source connection


 56. For target as well select the connection. Click on edit


 57. Select target connection.


 58. Save the workflow


 59. Right click on the workflow and start workflow


 60. The workflow monitor will open automatically and you can see workflow running.


 61. Wait till the workflow succeeds.


 62. Query the table in target database